Monday 17 November 2014

Poolside Tote by Noodlehead

I spotted the pattern for the poolside tote online back in the summer. A quick #poolsidetote entered on Instagram will bring up loads of pictures other people versions. I found the pictures very inspiring, so many beautiful bags. 


So I purchased the pattern but summer came and went and I hadn't made the bag. To be fair living in London I don't often find myself at the poolside (!) but the bag is roomy so will be appropriate for all the baby 'stuff' I drag around with me on a daily basis! 

My favourite part of crafting is choosing my fabric. As soon as I saw this pattern I thought of the Cotton & Steel August collection by Sarah Watts. The lions are so gorgeous and really striking up close. I brought the canvas lion fabric at the Festival of Quilts earlier this year without a specific project in mind. I purchased it from the Eternal Maker stall, who have such an array of gorgeous fabrics including lots of Japanese prints which I love. The girls on the stand are also super lovely even when they are so busy. I've also ordered online from their store and again great choice and good service. I think a trip to their shop is on my 2015 Bucket List! 

Cotton & Steel fabrics are great as their designs all compliment each other. So I knew I had to choose a print from the same line for the interior. I fell in love with this grey fabric. 


But grey is my go to colour & I'm trying to move away from always choosing the grey so I opted for the green version instead. (Still thinking I need to purchase the grey just in case I need it in the future :) I brought these fabrics from The Village Haberdashery in West Hampstead who stock the entire Cotton & Steel range. 


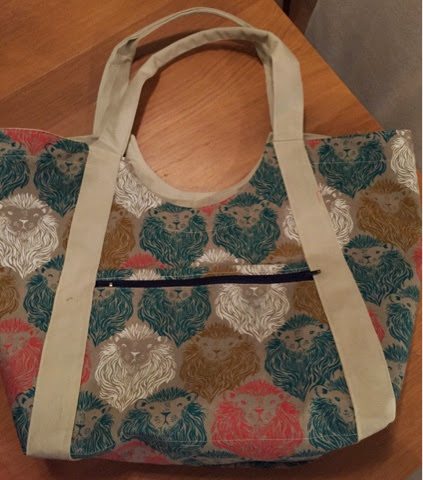
For the handle, facing and accent pieces I brought some cream canvas from Saeeds Fabrics in Walthamstow. At £5 per meter it was the cheapest part of the bag. In hindsight I wish I had gone for a bolder colour than cream but I am still happy with the end result. The same for the zip. I wasn't sure which colour to choose so I went for black. May be a blue would have been better or a cream to match the handles. 

I downloaded the pdf pattern and cut out the templates. There are not too many pieces and you have the option of a slip or zip front pocket. I went with a zip pocket as it feels more secure.  

When it came to cutting out the fabric the pattern was easy to understand and clearly illustrated. However, I do most of my sewing late at night when my little one is in bed so I get confused very easily. There's a handle and handle accent to cut out as well as facing lining and the exterior with pockets. I had to keep referring back to the diagrams to ensure I was cutting the right piece out of the right fabric. 
 
Once the pieces were cut, assembly was straight forward. Considering how large and smart the bag looks I had thought construction was going to be much more difficult. I got myself confused with attaching the lining but again late night seeing was to blame, the pattern was written out fine, my brain just read it differently! 

The bag feels so sturdy it's great. I am used to seeing tote bags but using canvas fabric and interfacing creates a strong finish. 


(this pic came out dark as it was near midnight - late night sewing again- but it looks so striking in the day light) 

Very pleased how this has turned out. Wish the pattern also came with a template for a smaller version that I could use as an everyday handbag. 


Cotton & Steel fabric was made for this project. I've seen some great versions on Instagram using the mustang canvas and the arrows cotton. 

I didn't want to waste the selvage. I ironed on the Cotton & Steel logo and the  words of wisdom onto some interfacing and roughly sewed them into the lining before seeing the lining to the exterior. 

Possibly a Christmas gift for a loved one? 

Tuesday 28 October 2014

Sewloft Patterns - Diana Cami

Sewloft patterns is a website set up 2 years ago by Lauren to sell her independent pdf dressmaking patterns for women. I came across the website earlier this year and loved all the patterns available. I downloaded the free Diana Cami pdf to see how I got on with the instructions and lay out.


Life (as always) got busy and I only recently got round to sewing the cami together. Since I first found the website it has gone through a lot of changes. The company has now been renamed Spit Up & Stilettos and can be found here. They have changed focus and are now offering a variety of projects, not just sewing. An explanation for the change in direction can be found on this blog.
Even better news is that now all patterns on the website are free, yes thats right FREE! No catch, no time limit, download and enjoy whenever you fancy :) I am already thinking about potential fabrics for the Harper blouse and the Emma pant!


Anyway, back to the Diana cami. There are not too many pieces to cut out, just the front and back piece and the bias binding for your edges and straps. There seems to be a lot of pages to print out, but that is because there are a lot of instructions. The step by step intructions are really detailed with great photographs, which is what I find great about the independent pattern makers.


For the fabric I wanted to try something striking for a change as most of my wardrobe is filled with safe colours and a lot of grey marl (my favourite). I recently ordered some fabric from Fabric Land.I had come across Fabric Lands website before but had never really got much further than the home page as the bright yellow pages and flashing/blinking/moving icons put me off. Its also difficult to get a good image of the fabric. The sight is very popular and when I had time to get my head around the website I placed an order.

Fabric Land encourage you to order samples of their fabrics as items can not be returned once cut. I wasn't placing a big order so I took a gamble and order based on the website description and was very pleased with my purchases. Unfortunately there isn't any options for online payment for goods, but orders can be taken efficiently over the phone. Postage depends on weight of your parcel once they have packed it so bear that in mind when ordering.

I found this bright neon pink leopard print stretch t-shirting fabric called 'Funky Daze'! Now the Sewloft pattern is not for stretch materials, I knew this but still decided to try and at £3.99 a meter it wasn't a big deal if it ended badly and the material wasn't super stretchy.

Once cut out the main body of the piece was simple and quick to put together. The bias binding however, proved more time consuming. This was my fault for choosing a stretchy fabric and I am going to try again with a cotton next time. 


I was really pleased with the end result. It is a low cut top and I wear it with a white vest underneath. This pattern is a great every wear for the summer months. I shall be making more.

Wednesday 17 September 2014

More Baby Makes

I've been buying lots of beautiful fabric recently and wanted to make another outfit for my daughter.
There are plenty of little girl dress patterns avaliable and it was difficult to pick just one.

I am a member of Sew Direct. Membership includes 33% saving on the cover price of Sew Today magazine and 40% off of pattern purchased in their online shop. Patterns are available from Vogue, Butterick, Kwik Sew & McCall. Plus there is usually a members only offer or another offer than reduces the price of patterns and postage is free.I love it when an issue of Sew Today arrives in the post. I grab a cup of tea and flick through all the pictures of the newly released patterns.

Sew Today ClubUK Direct Debit Membership  with 2 FREE patterns worth £29.50

I recently took advantage of a largely reduced pattern on the website by Butterick. Pattern number 5625. The pattern includes rompers, jumpers, panties and hats.

Infants Romper, Jumper, Panties and Hat Butterick Pattern No. 5625. Size NB-MED.
The first item I made was the reversible dress (described as a jumper on the pattern, item D).


I had 2 fab fabrics in my stash that I wanted to use. They don't really compliment each other but it doesn't matter too much as they are not seen together.

The first fabric is from Art Gallery Fabrics, Lotus Pond organic cotton range. The range is by designer Rae Hoekstra. I like pretty much all the patterns in this range and have brought a couple, but for this make I chose Snail Trail in multi.

Lotus Pond by Rae Hoekstra

(Adorable isn't it!)

Heres the rest of the range.
 I've got the first one on my wishlist. I've seen some lovely dresses made out of this on social media.


I purchased this fabric on a trip to The Village Haberdashery, based in West Hampstead, London (they have an online shop here). They stock all the latest fabrics and even though the shop is small, they manage to pack in so much to chose from. I purchased two fabrics from the Lotus Pond range plus some eyelet fabric on my first trip there. My second trip to the shop was after they got in the whole Cotton & Steel range and my bag was heavy when I left :) If you are not close to London, they have a great website. I haven't ever purchased online but I must say the customer service in store is fab and well worth a visit. The staff are very approachable and helpful. They also have lots of knitting and sewing workshops held in store. I was given a list of the current class schedule when I was there and am very tempted. Think I will be booking a dressmaking class in the near future.

The other fabric I chose for the reverse side of the dress is one I purchased in my local fabric shop, Stitch of Wanstead (they also have a website here). The fabric is called Great Flower designs 40' by 40's, superfine cotton lawn. It was only £6 per meter, I have had difficulty finding it online, but Stitch do stock it in their online shop here. There are 3 colourways but I liked the 'forest leaves on green'.

Forest Leaves on Green

Now to the pattern itself. There are very few pattern pieces. In each fabric there are 3 pieces to cut, and with your main fabric you also cut out 2 pockets. The original pattern uses ric-rac around the edges but I'm not a fan of ric-rac on clothing so I left this part out. Construction was really straight forward, just had to put the two fabrics right sides together and stitch round.

The pattern asked for buttonholes, but as I had to leave for a night shift at work and I couldn't remember how to use the buttonhole function on my machine properly. Instead I had some press studs in my stash so I used these.

I'm happy with the finished garment. I made a size medium which is slightly too big for my daughter but she can grow into it. Shes 10 months and still in 3-6 month old clothes, so its always difficult to know whether its worth getting the smaller size.


Its great over leggings and a vest and can be easily removed if it gets hot.

Update: since I did the draft to this post I have made another garment from the pattern. This time I tried item A the romper. These were really straight forward too. Only 2 back and 2 front pieces to sew together and a back and front facing. Such a quick make that I got out the sewing machine manual and worked out how to use the buttonhole function on my machine. A nice touch I think.
The fabric I chose was August from the ever popular Cotton And Steel range of fabrics. I brought this from the Festival of Quilts this year in Birmingham. It turned out nicely. 


Sunday 17 August 2014

#WIP First Quilt


I've never made a quilt before. I have always wanted to as there are so many lovely designs out there but never got further than the planning stage. 

Then last month a new magazine came out. Quilt Now. 


The projects are so much more modern than the other magazines I've seen. I really love heart shapes quilts so the project Rapture really caught my eye. 


The project uses Art Gallery fabric range rapture which are nice pastel type colours. I had a bag of Alexander Henry scraps from a friend of my mums that I wanted to use on a big project. 

Last week saw me and mum head off to Birmingham for Festival of Quilts where we purchased a Sizzix machine. We had been talking about getting one for ages and one stall had a great offer so we did. Cutting out squares is so much quicker this way!

The pattern uses 3 1/2" square but as we only have a couple of dies I went for a slightly smaller quilt and used the 2 1/2" square. Still looks good though. 

Last night whilst watching TV series Under The Dome I cut out the squares to make my quilt. 


Not all the squares are laid out in this picture as I ran out of room. 

I debated using some plainer fabric for some of the squares to break up the patterns but I really like how busy it is and against a white background I think it will stand out even more. 

Today's task is cutting out the 200 odd white squares. Once that's done the fun can really begin. 

Quilt Now first edition came with a beginners guide to quilting which will definitely help me with this project. 

Here are pictures of the fabrics I chose. I'll post more once I've made some progress. 


Monday 28 July 2014

A Simple Kimono


I never have enough cardigans. When you are rooting through your wardrobe for that cardy that will go with the rest of your outfit, the perfect item can not be found!

All of my cardigans are jersey/stretch material and as I am nowhere near being able to tackle these fabrics on my sewing machine I never considered making one. 

I recently took a trip to Walthamstow just to 'browse' the fabrics not to buy of course. I then returned home with this bundle :)


I loved the grey floral fabric. I brought 2 meters for £1.65 per meter! Amazing price huh! 

I was flicking through Pinterest after my shopping trip looking for some inspiration for what to do with my new fabric, when I stumbled across a simple Kimono pattern. 

The tutorial was on the Elle Apparell blog found here.


The tutorial was well illustrated and looked straight forward so I thought I would give it a go. 

The blogger used a gorgeous silk material for her kimono which hangs beautifully. My material was a poly cotton and didn't hang as well. 

The pattern pieces are cut based on your own measurements which is explained clearly. The neck and hem are cut curved free hand. I was nervous when cutting but it came out ok. 


The author uses a rolled foot hem to finish her edges but I just turned up a narrow hem and machine hemmed. 

What do you think of the finished product?? 


Friday 18 July 2014

Sew Together Bag

A regular topic that often pops up on Instagram is the #sewtogetherbag, with pictures of people's work in progress (#WIP). If you go search the hashtag you will be amazed at the number of people that have sewn this bag or are currently trying to. 

All the pretty pictures inspired me to have a go myself. The bag is a wash bag sized holdall which contains three separate zipped compartments inside and four open pockets. The designer originally made it as a bag for crafters to store all their tools as it surprisingly holds a lot but it can be used for anything. You can make it with a pin cushion inside as well but I left out this part.  

The pattern is designed by a blogger Sew Demented (www.sewdemented.com) and can be purchased directly from her website in PDF format. 


The pattern is good and well explained with no fancy terminology so is good for an eager beginner like myself. However the need to attach 4 zippers can easily put people off. The zips were not bad at all and straightforward. I found the binding more tricky and getting the sides attached. 

As it was my first attempt I decided to use left over fabric to make the bag.
I chose my favourite for the exterior, the Alexander Henry Zahara I had used for my dress previously. Many people go for a theme or coordinating fabrics but I liked the idea of using as many different colours that I had.  

For the side panels I used a yellow floral fabric from Michael Miller and it really stood out from the black and white Zahara. For the inside I used a different design of each compartment. The Red Skulls are by David Textiles Inc, the birds are Alexander Henry Birds of a Feather, the grey witches are The Ghastlies by Alexander Henry and the Racoons are Tula Pink for Free Spirit. 

For the inside of the zip pockets I used the Alexander Henry Sloane left over from making my duffle bag. 

The instructions are very clear, however I managed to initially put my zips on the wrong way which required some unpicking. Then I discovered someone had written a sew along tutorial for the Sew Together Bag. 

Heather at The Quilt Barn had a while ago launched a step by step sew along for the bag which is well illustrated and gives wonder tips on how to manage the tricky parts and can be found here (http://quiltbarn.blogspot.co.uk/?m=1). 
I found these instructions invaluable and highly recommend the website to anyone who wants to attempt the bag. 


When trying to put the bag together I really struggled to get the sides and bottom attached as there was so much fabric for the different compartments I couldn't feed it through the machine. This was even worse when the binding was added and I kept coming off the edge so after many attempts I decided to stitch the rest by hand. This is not the professional look the designer intended but it cured my frustration and got the bag completed. The isn't a gift, just for me so I don't really mind. 

Not sure I will attempt this pattern again in a hurry. The bag is great but not sure I could do the putting together any better. I still love looking through peoples completed bags on Instagram. Maybe next time I have lots of scraps of fabric to use I might reconsider. 

Wednesday 11 June 2014

Duffle bag


At the same time I purchased the Alexander Henry Zahara print fabric, I also brought his Somerville, Sloane in Sienna. The fabric is really stunning, the picture doesn't do it justice. 


Again, I purchased the fabric with no idea as to what it would become. I initially thought it would make a good t-shirt, but eventually decided on a bag. 

Being a new mum my handbag has gone from a simple clutch with essentials such as phone & keys, to a suitcase full of nappies, spare clothes, wipes bottles etc....
So a bag I would use on a daily basis would need to be large. 

I have had for a while a pattern for a duffle bag, purchased from Etsy. 
The bag looked large and the pattern instructions clear with lots of pictures. 


The Sienna fabric had an aubergine/eggplant base colour so I thought this would be a good lining colour to match. I purchased Moda eggplant solid via www.fabricrehab.co.uk and a matching eggplant zip. 


There was an option of adding inside pockets, but it's not something I use on my current bag so I decided to skip that step. 

The sides of the bag were interfaced and the bottom was batting and quilted. 


The instructions were straightforward to follow. I think I used the wrong material for the base as my bag had a saggy bottom. My dad suggested a sturdy piece of material at the bottom of the bag to stop any sags. I found a plastic folder so I cut a wide strip and placed it between the outer and the lining and the saggy bottom disappeared (thanks dad :). 

The sides were a bit fiddly to attach to the bottom piece and it took a bit of readjusting. I think I may have cut the bottom a little too long, but the instructions explain how to solve the excess material problem. 

I just love the fabric and a large bag shows it off really well I think. Eggplant has become my new favourite colour! I call this my Mary Poppins bag as it is so big inside and the colours remind me of the large carpet bag Julie Andrews uses in the film.  


The pattern includes a child size duffle but I used the adult size, which comes out the size of a weekender bag. 

You can find the pattern on Etsy just search for duffle bag pattern. The seller is ginia18.