Thursday 16 April 2015

Noodlehead Envelope Clutch

Two posts in one week! I'm playing catch up as I have been making loads but not adding them to the blog. So next up is a bag pattern by Noodlehead.


I'm a big fan of Noodlehead and made her Poolside tote last year, I also brought the pattern for the envelope clutch around the same time. I think the pattern for this bag had been updated so there were a lot of pics on social media which had me hooked. Instagram is terrible for my bank balance!

The pattern comes in 2 sizes, with additional instructions to make it a suitable size for an ipad. There are also options of adding an inside zip pocket, credit card slots, straps and 2 flap styles. So plenty of opportunity for making it your own.

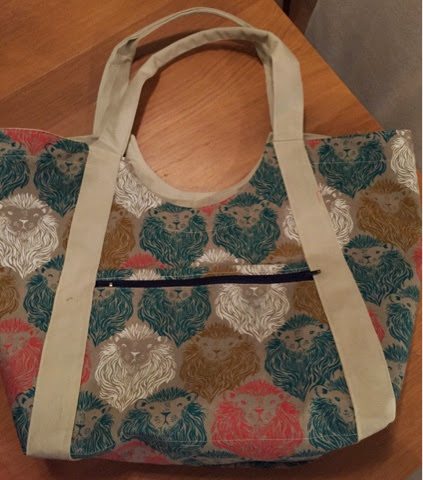
Since having my daughter I only ever use large bottomless bag - where many an item has been lost never to be seen again. So I wanted this clutch to hold my essential items within said bottomless bag. The large clutch 8" x 11.75" was the perfect size. 

Now for the best bit...fabric choice :). I have so many great quilted cotton fabric designs but I really prefer bags that are made from canvas or a heavier cotton as they feel more durable and have more of a professional finish, in my opinion. 

I purchased some of the Cotton and Steel Mustang canvas and was not sure if I would ever want to cut into it. Its so gorgeous and goes out of stock quickly. However, I though I would start a Cotton and Steel theme to my Noodlehead patterns so I got the scissors out and started chopping. 


The pattern gives instructions for pipping and I was really contemplating adding a neon pink or gold pipping to the clutch, but I have never done pipping before and didn't want to mess up my nice fabric, so I omitted it. Pipping really does give it a nice finish though so I think I will need to give it a go at some point. 

I didn't add the credit card slots as I won't be using them but I did add the zip pocket. The pattern used a magnetic snap for closure which I had never used, but they were sooo simple and quick to use. 

Everything went together really quickly and as with Noodlehead patterns the instructions are really easy to understand. I even found some metallic gold thread for the top stitching to match the gold of the fabric. 


I absolutely love my clutch, it is the perfect size for a pack of baby wipes and few nappies and some nappy bags (how rock n roll has my life become!). I've been using it for a few months and I'd be lost without it. I haven't made a small version yet, but I brought some of the new Cotton & Steel Mesa canvas from The Village Haberdashery and I think it will look great. 

Since making this I have made three more as gifts. For two friends I put their Christmas presents in them instead of wrapping paper. Unfortunately I didn't get any pics as, typically for me, I was finishing sewing them just before leaving the house to see them. 


The fourth one I made out of Echino 10th anniversary stag with glasses linen fabric for my bestie who has just had her first baby. I adore this fabric and was so glad they brought it out in different colourways for their 10th anniversary. 


As I'm writing this I'm think I could maybe make a small one for myself in the Echino fabric too? A girl can never have too many bags right??


Monday 13 April 2015

Chemo turbans

I've been lucky to have healthy active parents throughout my life, so near the end of last year, when my mum was diagnosed with ovarian cancer we were all a bit shocked. At 68 she has never had any health issues and is from a generation of women who 'carry on regardless' even when something isn't feeling right. This motto has done her well through her life until recently. She experienced intermittent stomach discomfort and a bloated belly but didn't think anything of it so didn't mention it to anyone. It was only when her nephew visited and commented on her weight loss did we think something might be up.

Living with someone and seeing them everyday means you don't noticed the gradual weight loss. Now when I look at photos taken earlier in the year compared to today I'm shocked, I mean how could we not have noticed?! There's been about 10-14kg lost and on a woman who is 4 foot 11 it's a lot. 

To cut a long story short (where I nearly lost all faith in the National Health Service) it took about 3 months to get a definite diagnosis and start treatment. During which time her health deteriorated.  

I didn't know anything about ovarian cancer before this all happened. Unfortunately it's one of those silent types, where for most people it's not discovered until it's stage 3 or 4. Mum has stage 4b, so things are pretty bad. We are now under St Barts hospital in central London and the treatment and care have been great. 

As a family we are all trying to come to terms with what's happening. We are all dealing with the news differently but not too well to be honest. However, I'm a doer. So I feel much more useful if I can practically help. Hence the chemo turbans!

My mum has always had nice, healthy looking hair. As soon as she was told she would need chemo her first question was, "am I going to lose my hair?" It was a big deal to her. I'll admit I got a little frustrated with her, here we were getting awful news and she was worrying about a bald head!! However, I think it was just her way of coping with the news. The cancer nurse said a lot of women find it hard as its a constant reminder whenever they look in the mirror that they are ill. I suppose you can't truly understand until you are walking that path. 

She's always had short hair and about a week after the first chemo session clumps of hair started falling out. I think I noticed before her as when I went in the bathroom there was hair around the sink and on the floor. She didn't want a wig till the hair was all gone so I had a look on the Internet for chemo hat patterns. My mum said her mother used to wear turbans when doing the housework and they looked nice so she wanted to try that. 

I googled chemo turban patterns and was surprised at the amount of sites there were. A read a few and found them a little confusing until I found this from sewing.org. under their charitable sewing and craft projects tab.

Just one page of instructions is all that is needed. Apparently 15 members of the Bernina Sewing Club made 191 in one day. Quick and easy, my favourite kind of sewing. 

There are 3 pattern pieces and it takes about 15 mins to make one using a knit fabric. 

Fabric choice was an issue for my mum. We have very different tastes in fabric! Last year I ordered from the American company who specialise in quirky knit fabrics Girl Charlee. Well worth a browse on their website, but UK peeps beware of additional shipping charges if your package is stopped at customs.

My mums favourite fabrics were the foxes and pineapples and my mum isn't one to shy away from standing out, so a quick half hour later she had two funky chemo turbans.


Pretty funky huh! I've also made a couple more out of cheap fabric from Walthamstow market, and she had a leopard print jumper and requested an animal print turban to match. Mum has a wig now which she wears when she goes out, but they can get a bit uncomfy and hot, so the turbans are great for around the house. 

If your still reading...well done! If you know anyone who is going through a similar journey and you can sew a few bits of material together I really recommend the tutorial I used, if you can add a bit of fun to a pretty awful situation why not? 

p.s. 8th May is World Ovarian Cancer Day. I knew nothing about this cancer before all this happened and I wish I did. For all the ladies, young and old, it is important to familiarise yourselves with the symptoms. If something doesn't feel right, get it checked. Lets make people more aware of this 'silent' killer. 

Sunday 25 January 2015

Reading goals for 2015

My life isn't all babies and sewing. When I have the time I enjoy a good book.

When scrolling through my Instagram feed a few weeks ago I spotted a reading challenge called 26 Books with Bringing Up Burns. 


There's a blog called the Burns family blog (Instagram @Bringingupburns) and to reach their reading goals for 2015, created a list of 26 prompts from which to chose a book to read. For instance, a book set in a place you would like to visit or a book you own but haven't yet read. Their aim was that whatever types of books you are into you will be able to cover all 26 items on the list.


There has been massive social media interest and I love scrolling through #26bookswithbringingupburns and seeing what everyone else is reading. I've also got more ideas for books I would like to read next. 

Another amazing blogger Knitty Bitties has made a printable bookmark of the challenge and shared it on her blog for us all! I've printed mine off and will cross them out as I've read them. 

I've just finished my first book of the challenge. The Husbands Secret by Liane  Moriarty. This is number 1 on the list, a book I own but haven't read.


What a great read. Keeps you hooked till the very end. Through the challenge many others have recommended this authors other books so they have been added to my wish list. 

Need to crack on with my next read. What to pick...

Saturday 17 January 2015

Bronte top

 
Perfect Pattern parcel are a company who collaborate with indie pattern designers to offer people like us bargain priced bundles of patterns at the same time as raising money for children's education. Throughout the year they release a bundle of patterns for limited time only and you have a choice of how much you wish to pay for them (too good to be true huh). If you pay $32 or above you not only get the 5 patterns in the bundle, you also get a bonus pattern! So that's 6 fantastic patterns for $32 - wow!
 
The last pattern parcel for 2014 was a bag pattern bundle which looked fab. I have so many bags patterns I haven't tried yet, I decided not to purchase the bundle - totally regret that decision now its too late of course!


In October 2014 they released a bundle of women's patterns which social media went crazy for.
 
Perfect Pattern Parcel's photo.
 
The parcel included dresses, skirts, cardigans, tshirts and lounge pants. Most ladies would be able to make a new wardrobe out of these beauties. I had actually purchased the Julia cardigan pattern previously, but even with that the parcel was well worth the money.
 
Deciding what to make first was difficult. I have so many ideas for fabric choice, its hard to chose, but I needed a quick make and I saw other bloggers post how quick and easy the Bronte top was I chose this.
 
 
The Bronte pattern is by Jennifer Lauren Vintage. Its a cute fitted top, made with knit fabric. What makes it different from most top patterns is the lapped shoulder detail. It reminds me of my daughters baby grows. The top can be made for causal wear or with more interesting fabric can be made suitable for a night out. The pattern came with the option of short or long sleeved.
 
I have been browsing the Girl Charlee website for some months before I took the plunge last year and did my first overseas fabric order. Girl Charlee are a US company who specialise in knit fabric, offering quirky designs that can't be found elsewhere. I ordered a lot of fabric from them (and ended up with a customs charge :( ), but was worth it as I haven't found a UK company that offers as good a fabric as they do. I ordered a yard of a grey marl knit with cute foxes on it. I initial planned leggings for my daughter, but as its turned cold here I went for a top for me.
 
I had used some of this yard of fabric to make a hair turban for my mum (more on that in another post), so I had a little under a yard. Girl Charlee provides info such as percentage stretch for all the fabric on their website. This print had a stretch of 30%. The Bronte top recommend at least a 40%, and I should have cut a bigger size to take this into consideration, but I didn't and it ended up ok - just.
 
The pattern was really easy to follow. The diagrams help with placement if the pieces to create the lapped neckline. There is a Bronte sewalong on the Jennifer Lauren website and can be found here. I didn't see this till I had made my top, but looks good so I will use it when making my next.
 
I see myself making lots more of these as they are a quick and easy addition to the wardrobe.


Can't wait to see what Perfect Pattern Parcel bring us in 2015!


Monday 5 January 2015

Colette Seamwork Magazine

I've been so bad at blogging recently. Well actually I've started lots of posts but they are still drafts waiting to be publish once I take some more pics etc. I love this next make so much it needed to jump the queue. 

Colette are independent pattern makers who are responsible for some great garments such as the Mabel skirt (I've made 2 already!) and the Laurel dress (on my to do list). 

The Mabel 

The Laurel


A couple of months ago they launched a new digital magazine Seamwork, that includes articles,tips for sewing with different fabric types and of course some great patterns that can been seen together in super quick time. 

Sounds too good to be true right? Well it is so get subscribing! 


The first issue contained 3 patterns, the Oslo Cardigan, the Madrid Bag and the Valencia Bag.


I was instantly drawn to the Oslo. When looking at a sewing pattern I normally pick the dresses and garments for a night out. I have a one year old, nights out are few and far between so my aim is to make some wardrobe staples. Things I will wear on a daily basis, not for birthdays and Christmas! 

The Oslo is a cardigan made out of knit fabric that can be made in 2 hours. 


They show a few option of fabric for this make, so it can be made as a lightweight carry or a thick, cozy and warm piece. I had a work Christmas party booked on a very cold weekend in December so I needed something warm to wear. 

On a trip to Goldhawk Road I found a cream wool fabric for £15 per meter. It was thick and fluffy so perfect for keeping me warm. I purchased 2.5 meters, 2 meters would have probably need enough. 


I printed the pdf and taped the pieces together. This was probably the longest part of the process (isn't it always!). There aren't many pieces to this cardy. The cuffs are separate and can be attached with the seam outwards and the cuff is turned up to cover the seam or the other way round. 

Assembling the pieces was quick and easy. The instructions were clean and simple to understand. A great project for a beginner or a quick make for the experienced sewer. 

This was the first time I used wool but I didn't have any problems. The machine was very fluffy afterwards though (and my clothes and the floor...). 

I'm going to be making a lot more of these cardigans. I've got some nice quilted Jersey that would make another warm one and some fun prints from Girl Charlee that will be good for some lightweight ones. 


Monday 17 November 2014

Poolside Tote by Noodlehead

I spotted the pattern for the poolside tote online back in the summer. A quick #poolsidetote entered on Instagram will bring up loads of pictures other people versions. I found the pictures very inspiring, so many beautiful bags. 


So I purchased the pattern but summer came and went and I hadn't made the bag. To be fair living in London I don't often find myself at the poolside (!) but the bag is roomy so will be appropriate for all the baby 'stuff' I drag around with me on a daily basis! 

My favourite part of crafting is choosing my fabric. As soon as I saw this pattern I thought of the Cotton & Steel August collection by Sarah Watts. The lions are so gorgeous and really striking up close. I brought the canvas lion fabric at the Festival of Quilts earlier this year without a specific project in mind. I purchased it from the Eternal Maker stall, who have such an array of gorgeous fabrics including lots of Japanese prints which I love. The girls on the stand are also super lovely even when they are so busy. I've also ordered online from their store and again great choice and good service. I think a trip to their shop is on my 2015 Bucket List! 

Cotton & Steel fabrics are great as their designs all compliment each other. So I knew I had to choose a print from the same line for the interior. I fell in love with this grey fabric. 


But grey is my go to colour & I'm trying to move away from always choosing the grey so I opted for the green version instead. (Still thinking I need to purchase the grey just in case I need it in the future :) I brought these fabrics from The Village Haberdashery in West Hampstead who stock the entire Cotton & Steel range. 


For the handle, facing and accent pieces I brought some cream canvas from Saeeds Fabrics in Walthamstow. At £5 per meter it was the cheapest part of the bag. In hindsight I wish I had gone for a bolder colour than cream but I am still happy with the end result. The same for the zip. I wasn't sure which colour to choose so I went for black. May be a blue would have been better or a cream to match the handles. 

I downloaded the pdf pattern and cut out the templates. There are not too many pieces and you have the option of a slip or zip front pocket. I went with a zip pocket as it feels more secure.  

When it came to cutting out the fabric the pattern was easy to understand and clearly illustrated. However, I do most of my sewing late at night when my little one is in bed so I get confused very easily. There's a handle and handle accent to cut out as well as facing lining and the exterior with pockets. I had to keep referring back to the diagrams to ensure I was cutting the right piece out of the right fabric. 
 
Once the pieces were cut, assembly was straight forward. Considering how large and smart the bag looks I had thought construction was going to be much more difficult. I got myself confused with attaching the lining but again late night seeing was to blame, the pattern was written out fine, my brain just read it differently! 

The bag feels so sturdy it's great. I am used to seeing tote bags but using canvas fabric and interfacing creates a strong finish. 


(this pic came out dark as it was near midnight - late night sewing again- but it looks so striking in the day light) 

Very pleased how this has turned out. Wish the pattern also came with a template for a smaller version that I could use as an everyday handbag. 


Cotton & Steel fabric was made for this project. I've seen some great versions on Instagram using the mustang canvas and the arrows cotton. 

I didn't want to waste the selvage. I ironed on the Cotton & Steel logo and the  words of wisdom onto some interfacing and roughly sewed them into the lining before seeing the lining to the exterior. 

Possibly a Christmas gift for a loved one? 

Tuesday 28 October 2014

Sewloft Patterns - Diana Cami

Sewloft patterns is a website set up 2 years ago by Lauren to sell her independent pdf dressmaking patterns for women. I came across the website earlier this year and loved all the patterns available. I downloaded the free Diana Cami pdf to see how I got on with the instructions and lay out.


Life (as always) got busy and I only recently got round to sewing the cami together. Since I first found the website it has gone through a lot of changes. The company has now been renamed Spit Up & Stilettos and can be found here. They have changed focus and are now offering a variety of projects, not just sewing. An explanation for the change in direction can be found on this blog.
Even better news is that now all patterns on the website are free, yes thats right FREE! No catch, no time limit, download and enjoy whenever you fancy :) I am already thinking about potential fabrics for the Harper blouse and the Emma pant!


Anyway, back to the Diana cami. There are not too many pieces to cut out, just the front and back piece and the bias binding for your edges and straps. There seems to be a lot of pages to print out, but that is because there are a lot of instructions. The step by step intructions are really detailed with great photographs, which is what I find great about the independent pattern makers.


For the fabric I wanted to try something striking for a change as most of my wardrobe is filled with safe colours and a lot of grey marl (my favourite). I recently ordered some fabric from Fabric Land.I had come across Fabric Lands website before but had never really got much further than the home page as the bright yellow pages and flashing/blinking/moving icons put me off. Its also difficult to get a good image of the fabric. The sight is very popular and when I had time to get my head around the website I placed an order.

Fabric Land encourage you to order samples of their fabrics as items can not be returned once cut. I wasn't placing a big order so I took a gamble and order based on the website description and was very pleased with my purchases. Unfortunately there isn't any options for online payment for goods, but orders can be taken efficiently over the phone. Postage depends on weight of your parcel once they have packed it so bear that in mind when ordering.

I found this bright neon pink leopard print stretch t-shirting fabric called 'Funky Daze'! Now the Sewloft pattern is not for stretch materials, I knew this but still decided to try and at £3.99 a meter it wasn't a big deal if it ended badly and the material wasn't super stretchy.

Once cut out the main body of the piece was simple and quick to put together. The bias binding however, proved more time consuming. This was my fault for choosing a stretchy fabric and I am going to try again with a cotton next time. 


I was really pleased with the end result. It is a low cut top and I wear it with a white vest underneath. This pattern is a great every wear for the summer months. I shall be making more.